FREQUENTLY ASKED QUESTIONS
Some of the answers below have several pictures. Hover over them to find the controls.
To whizz forwards or backwards: arrows
To see thumbnails: use the circles at the bottom
-
I am assuming you want it simple. But you also want indicators, electric start and a few warning lights. And you definitely don’t want it to break down.
So if you are basing your custom bike on an old bike, consider that there are two distinct phases. 1) Restore the bike to as-new condition. 2) Customise it. A lot of people skip (1). This is called wishful thinking, and it is the same mental process that encourages belief in unicorns.
OK? Right, the simplest loom design would use a three-position Harley-type ignition switch. This gives you OFF in position 1, ignition and signals in position 2, and adds lights in position 3. It’s easy to wire up and removes the need for a lights on/off switch, or a changeover relay, to cut the headlight when the starter motor is turning.
Besides the switch you’ll also need to mount the following components: four-way fuse box (main, lights, signals, ignition); regulator rectifier (ElectrexWorld make good quality ones); starter solenoid; ignition amplifier box and coils; flasher relay; indicators; head, tail and number plate lights; brake light switches; some sort of dash; plus the handlebar switches to do start, run/kill, hi/lo, left/right and beep. All these parts need mounting to the same standard as, say, Honda do. It takes a very long time, and lots of thought. Not to mention trial and error.
Some people skip this bit too. But you’re not one of those people. You’re going to sort out all the brackets and rubber mounts before you paint the frame, not after.
Try to mount your battery, fuse box, reg rec and starter solenoid as close together as possible. That way you keep thick battery cables to a minimum. A battery at the extreme end of the tail section sounds really cool. But it uses up a lot of wiring space, and five metres of 16mm sq. hi-flex cable costs a fortune.
Use a GRP or gel battery. Everyone wants a lightweight lithium one but they are expensive and fussy: they need three-phase charging and a MOSFET regulator rectifier as a minimum requirement. Even then they aren’t completely trustworthy. You only have to see one lithium battery meltdown to be put off them for life.
Switchgear: push-button ones with through-the-bars wiring might appeal but are very fiddly to organise. They also require an interpretation device such as an M Unit or B Box (see below) which will cost you several hundred quid. Replica 1970s Yamaha or Kawasaki switches are good, and suit the vibe of many builds. Or you could buy cheap switchgear off eBay. Then again you could hit your own head with a brick.
The same goes for cheap, unbranded lights, indicators and ignition switches. Trust me, they are a total pain in your arse. If you want a one-stop shop for lights and dashes, go to Digital Speedos. Everything they sell is good kit.
M-Units (now rebranded as mo.Units) remain bafflingly popular with custom builders, despite the massive extra cost and complication. Maybe that’s the secret – they’re brilliantly marketed, and very nicely made. But ask yourself: What problem will my custom bike have which an M-Unit will solve? If you can provide a convincing answer, fill your boots. I just can’t see the point.
LED indicators have taken over, mainly because they are small and available in so many styles. You will therefore need an LED flasher unit. If you have an aftermarket dash, with indicator warning lights, get a three-pin flasher unit (the extra pin is earth). Some aftermarket dashes won’t flash their warning lights with a two-pin unit. Don’t ask me why.
The two things you generally leave unchanged are the charging and ignition systems.
-
As a general rule, avoid anything cheap and unbranded because it will be rubbish. There are plenty of indicators, for instance, which look like Oxford Cateyes but have about a quarter of the brightness. When you are waiting to turn right on a sunny day and a car runs into the back of you, it’s a good time to reflect on the words ‘false economy’. Same deal for switchgear. I’ve seen eBay light switches whose wires are so pared to the bone they can barely handle the current of a 60 watt bulb.
There’s a big selection of high quality lighting and instruments on the Digital Speedos website. It’s a good shop.
Indicators: a few companies still sell LEDs with separate resistors to make them work. Most have moved on. The main issue with fitting LEDs is stepping up the ultra thin cables to a normal connector size.
Switchgear: replica Japanese stuff from the 1970s, 80s and 90s is good quality, often very handsome and generally rebuildable. Try Yambits (Yamaha), Z Power (Kawasaki), Dave Silver (Honda). Allens Performance do some nice switches by Domino, among others. And of course there are the widely available ‘classic’ biscuit tin Lucas switches, as fitted to old Brit bikes of the 50s and 60s. Vehicle Wiring Products are as good a place as any to get them, since their service is so rapid. Most British electrics from that time are dreadful, but the handlebar switches work quite well.
If you want BSB-style push buttons, Bikesport Developments are your man. Remember that these buttons are for fully electronic bikes so need an interpretation device such as an ECU, or at least a relay. They (mostly) don’t carry enough current for things like lights and ignitions.
Finally there are the push-buttons from Motogadget, Motone and a few others. These are designed for through-the-bars wires and are, if you ask me, an absolute bastard to fit. They too need an interpretation device, such as an M Unit or B Box, to convert a momentary push to a permanent signal. And to step up micro currents to the six amps you need to power your headlight. Recently on eBay I’ve seen some latching push-button switches from China which don’t need a device. They worked OK on my mate Jim’s Commando.
-
Course you can. I need: some pics to show where the electrical components are, the original wiring diagram, and extensive details on every non standard part you plan to fit: wire colours, and what each wire does. I can help you with this if it gets confusing.
I charge by the hour. A complicated diagram is five or six hours, so £150-£180. A simple one on a bike without indicators might be three hours, so £90. If you want I can label the diagram showing what rating cable to use, and tell you what tools and materials you will need. Good places to buy cable, sleeving, tape, tools, terminals, blocks and heat shrink are Kojaycat and Vehicle Wiring Products.
-
This is a nerdy question because everyone leaves it up to me. But here are the pros and cons of different systems.
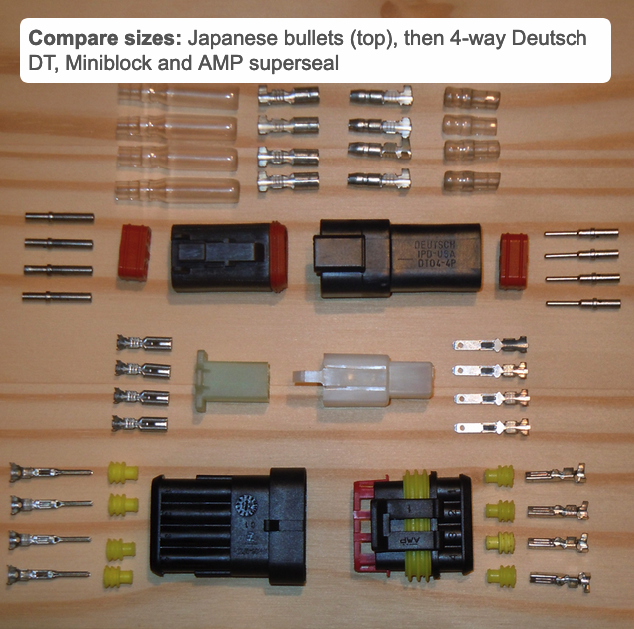
The cheapest and most compact multi-connector for general cable is the Miniblock. It was original equipment on most Japanese bikes in the 1970s, 80s and early 90s, and can easily last decades. Advantages: quick to assemble, packs a lot of wires into a small space. Disadvantages: moderately awkward to pull the blocks apart, slightly open to the elements where the wires go in. Molex or Mate ‘n’ Lock connectors, used on some 1970s Italian bikes, have similar virtues and failings. Good source: Vehicle Wiring Products.
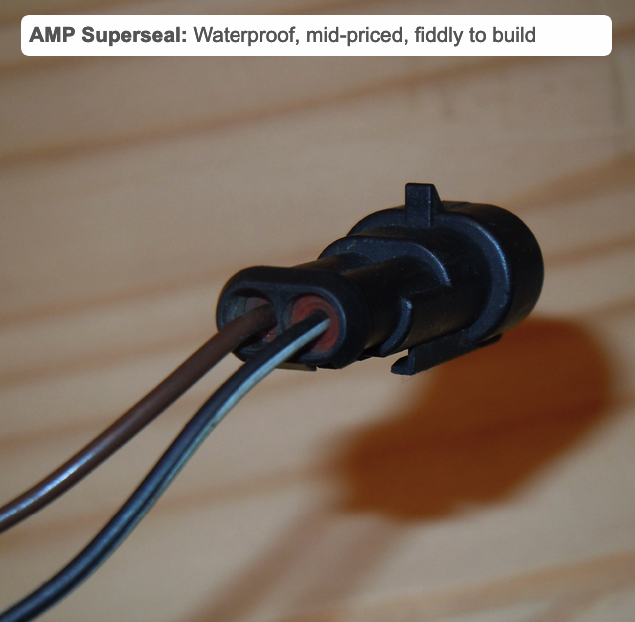
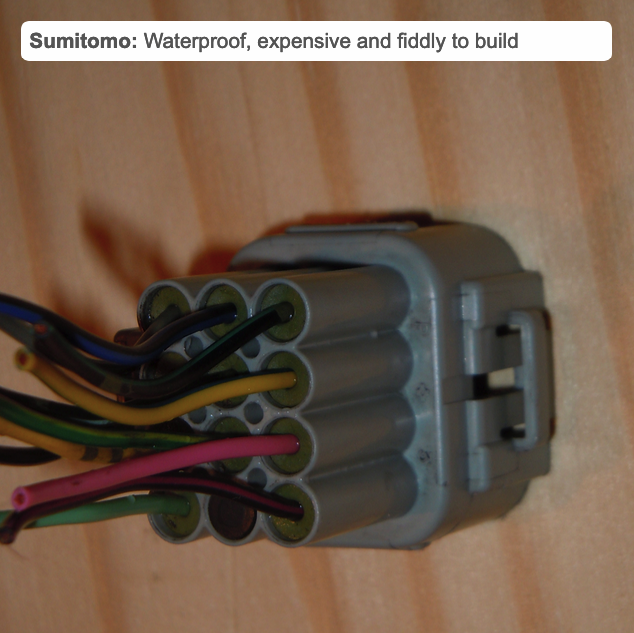
Sealed connectors, such as the Superseal ones used on 1990s Ducatis, or the Sumitomo, Delphi or MT plugs on many late 1980s onwards Japanese bikes, have little seals to offer near total weatherproofing. Superseal blocks are a bit iffy in my experience. Hardly anyone crimps them properly. The Japanese sealed plugs, while more expensive, are a better product. The downside with sealed plugs is that they are fiddly, require specialist tools and take a bit more time to assemble. Best sources: Kojaycat and Automotive Connectors.
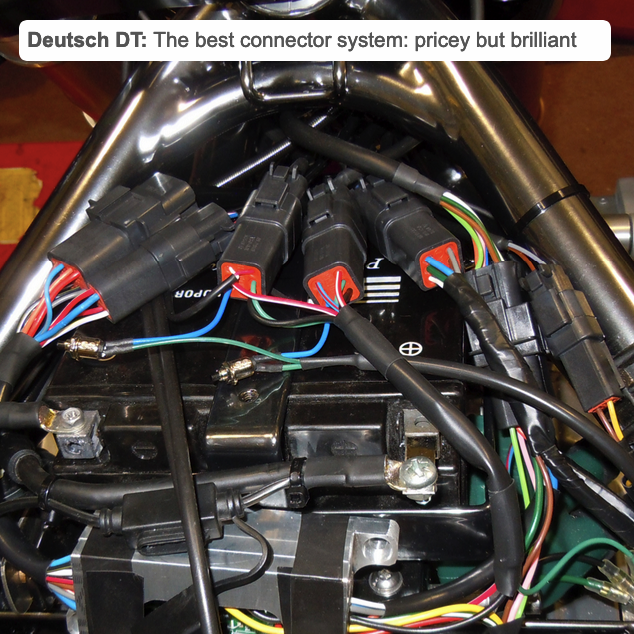
Deutsch are the Rolls Royce of connector block manufacturers, and their prices reflect that. The weatherproofing is superb, they’re reusable, they’re quick and reliable to assemble, and separating the blocks is a piece of cake. Most block sizes can be clipped to a flat surface too. The one big snag is bulk: Deutsch need a bit more space than other kinds of connector block, and there isn’t always room. The biggest virtue of the Deutsch system is its super-slim pins. These allow you to make re-usable joins with no connector blocks at all – just pins hidden by heat shrink. It’s almost invisible, which is handy on a custom bike. Best source: Polevolt.
Most original equipment loom builds use several types of connector, depending on exposure to the weather, current flow and which component they’re attached to. But they always favour one main type, and it can be any of the above.
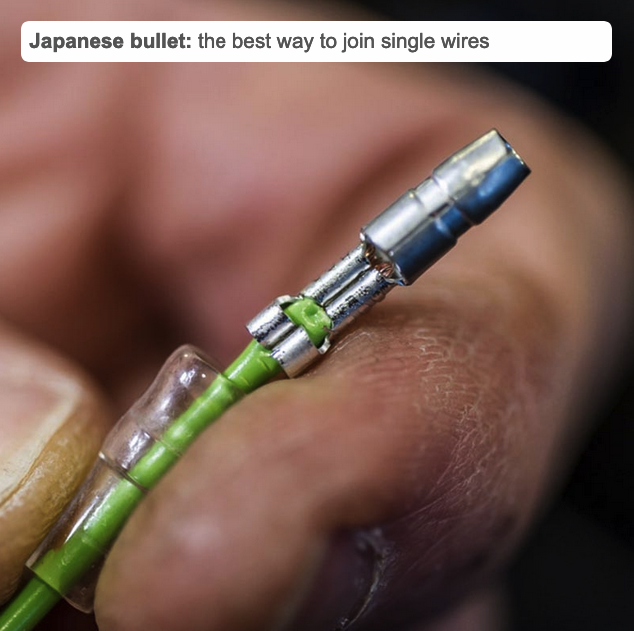
A quick word on Japanese bullet connectors, which are the standard for one-to-one or one-to-two joins. They are quick to make up and space efficient. Annoyingly their crimp tags (and the tools) are designed for fatter old-school cable, rather than the thinwall cable available today, so their crimps can be a looser fit on cables than was originally intended (I bulk up thinwall tag areas with a few millimetres of 2mm PVC sleeve, which also helps keep the weather out). 1970s Japanese bullets were 3.5mm. Most later stuff is 3.9mm. The difference sounds small, but it matters.
All the above are not to be confused with Lucas brass bullets, which only make sense on period Brit restorations.


-
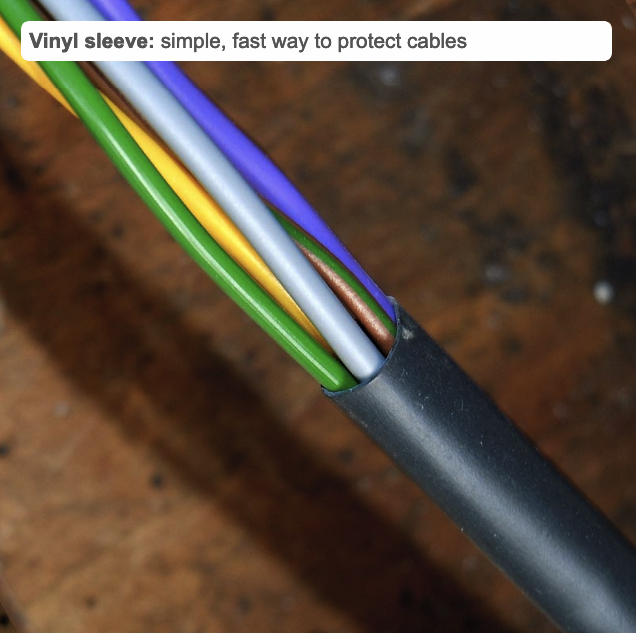
This is about how you want the main trunk and branches of the loom to be bundled up. Simplest and fastest (and therefore cheapest) is PVC sleeving mixed with a spiral wrap with very high quality loom tape. Most looms I make are finished like this.
Simple looms with only a few branches can be almost entirely PVC sleeved. Vinyl makes it easier to trace wires around the bike, because you can easily see the colour of the cables disappearing into junctions and connector blocks.
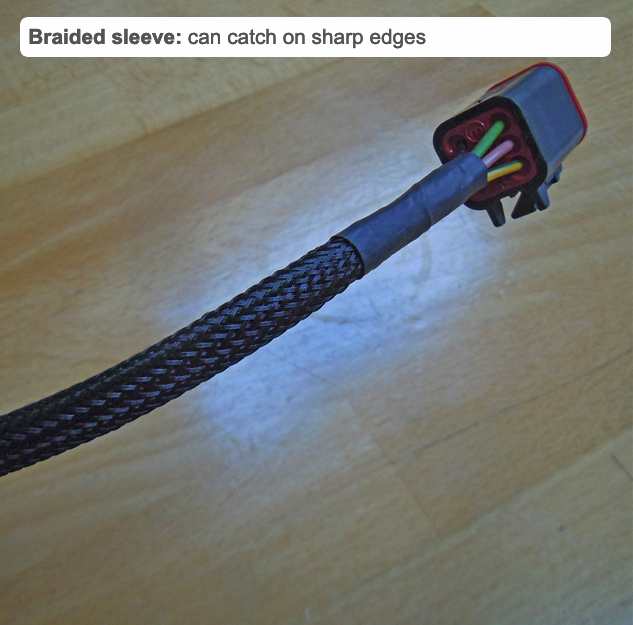
You can get black fabric heat-shrink sleeving in a few sizes. It looks great on British bikes, but needs a little care because the ends must be sealed with glue-lined heat shrink or they fray. Not to be confused with polyester expandable braid, which belongs in a Christmas cracker.
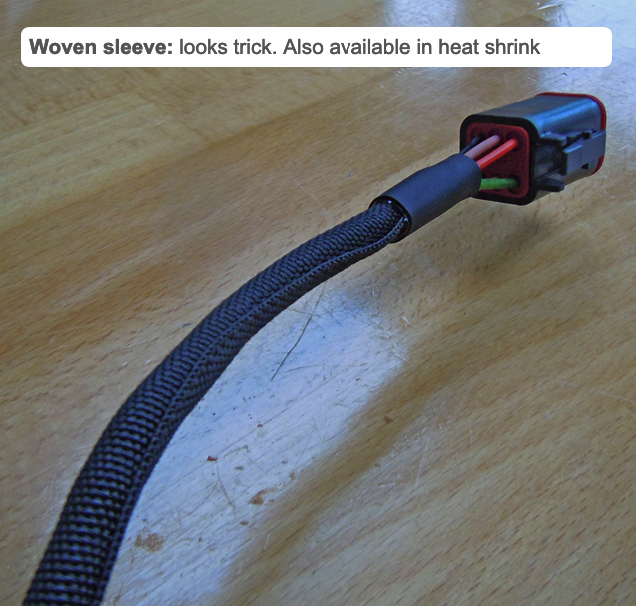
Racing or custom bikes often have a polyolefin heat shrink outer cover on the bigger sections, or even on all the sections. You build it up like a tree in reverse – twigs first, then branches, then the main trunk, sealing with overlapping heat shrink each time. It’s tricky to make but looks good on a racer and is reasonably hard wearing if the heat shrink is good quality.
-
Often, yes. Especially the switches with metal bodies. I’ve had an XS650 handlebar switch from a USA bike that was locked solid with solidified wind-blown dust. Once I got it apart, cleaned everything, replaced the wires and rebuilt it with silicone grease it worked perfectly. Japanese switches are the easiest; switches for BMW boxers are trickier but can be brought back from the dead too.
-
Yes – but it’s not the best idea, because it creates problems later on when you fit something that fouls a cable or wotnot. Wherever possible it’s best to work on a clean, fully finished and painted bike – with all the electrical parts securely mounted. I can make most brackets, and source a fabricator to do anything more complicated.
If you need a direct replacement for a standard loom, it helps to have the standard loom in place. And for the bike to be properly clean.
I have to start the engine to test charging and ignition. A very common problem at this point is blocked or leaking carbs. Fixing this can take a long time and add a large amount to your bill (we’ll discuss it first).
-
Course you can. Just buy my £20 manual (available in the Shop section of this website).
If you’re not sure yet, think of it like chess. You have to think several steps ahead.
Let’s assume you understand the idea of electrical circuits, you get parallel and series connections, and you can choose the right gauge cable for high and low current parts of the loom (Vehicle Wiring Products and Kojaycat have helpful advice on their sites).
Unless you are a genius you will then require a full colour wiring diagram to work from. If it’s a custom bike you’ll need to draw the diagram.
Once you start laying out wires, you’ll need to visualise how they will run around the bike in the most invisible and durable way. As that is a 3D problem, a 2D wiring diagram can only get you so far. This is the hardest part.
As for materials: for a reasonably complicated loom, around £200 of crimp tools, wires, sleeves, tape, solder and connectors might be enough.
On the other hand if you’re baffled by electricity, never read instructions and frequently walk into glass doors, you might be wise to give loom building a miss.
-
Assuming the cables aren’t eaten by rats, or submerged in seawater, or repeatedly drenched in fuel and oil, it will last a very long time. I’ve seen old Honda looms, built with exactly the same construction techniques, still working nicely after 20 or 30 years.
-
Easy one, this.
1. Fit worn-out or bunged-up carbs so that the bike is impossible to start once the loom is built. (I have to start it to test the charging system.) Or just turn up with a bike that is filthy and knackered.
2. Get the frame painted before you’ve welded on brackets for all the electrical accessories.
3. Go for push-button switchgear with through-the-bars wiring, a Motogadget M Button and a bluetooth M Unit. It takes hours to fit, costs a fortune, and does… the same as a normal setup.
-
I don’t do looms for bikes with ECUs. I also don’t do Harleys, or anything else that’s massively heavy and awkward to move around a crowded workshop full of £200,000 pound cars.